|
|
||
|
|
|||||||
|
|
||||||||
|
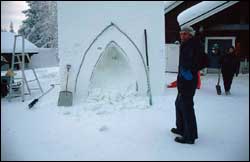
Snow Construction |
||
|
|
||||||||||||||
The steps of snow sculpting
1. Designing and Making a Scale Model Making a snow sculpture starts with brainstorming and choosing the site. It is important to consider the size and design of the sculpture in relation to the site as well as possible light from street or yard lamps. Sculptures should also be placed so that they don't obstruct traffic visibility or come in the way of maintenance trucks. The design starts with sketches and a scale model. Making a scale model is helpful for understanding the sculpture as a three-dimensional work. It is also useful as orientation to the technique of snow sculpting, i.e., removing material by sawing and carving. A model can be made from modeling clay or Plasticine, clay, paper and wire, Styrofoam, polyurethane (a light, Styrofoam-like material that is easy to saw into simple shapes), or even wooden blocks. A scale model can also be carved from a piece of plaster cast on an empty milk carton. It is an inexpensive option, although working with plaster is more time-consuming than Styrofoam or polyurethane. The model is needed at the actual sculpture site, so it has to endure transportation, cold weather, and moisture. Since it doesn't freeze, modeling clay is better suited for below-zero temperatures than natural clay. The choice of the material for the model can support the idea of the snow sculpture itself, whether it utilizes simplified, sharp, or soft forms. Polyurethane, plaster, and wooden blocks are suitable for simplified forms, while clay and modeling clay are good for detailed and plastic designs. 2. Packing a Block of Snow Once the sculpture has been designed, a mold must be chosen. Usually molds are made of plywood and reinforced with laths, with the corners connected with locks or screws. A wooden or metal mold is essential when making large blocks of snow. Smaller blocks can be made using pieces of linoleum or sturdy cardboard boxes. Many kinds of molds are sold in stores, but they are also easy to make at home. To make a snow block by hand, snow is shoveled into the mold in 20-centimeter layers and packed tight after each layer. This must be done carefully so that the mold doesn't start leaning on one side. The mold can be taken off immediately after the snow is packed. At first the block is very soft, but it will harden overnight. 3. Outlining a Sculpture On each side of the preform the outlines are carved or marked with sticks or spray paint. In a large sculpture the straight lines can be marked with chalk line. 4. Rough Sculpting Snow is removed along the marked outlines using rough tools such as saws, shovels, or chopping knives. If the block is very large, the sculpting should be started from the top part. As the shape of the sculpture begins to come out, the snow on the ground should be shoveled away before it gets packed on the ground. 5. Fine Sculpting and Finishing Touches Finally, the details of the sculpture are completed using small saws, chisels, and files. Chisels and files are also used for giving the surfaces a finishing touch. This is usually the most time-consuming part, requiring painstaking concentration, but the reward is a beautifully finished sculpture. The work is finally done when its surroundings are tidied up as well.
|
|||||||||||||||
|
|
||||||||||||||
© Lapin yliopisto, Kemi-Tornion ammattikorkeakoulu, Rovaniemen ammattikorkeakoulu |
|