|
|
||
|
|
|||||||
|
|
||||||||
|
Snow Construction |
||
|
|||||||||||||||
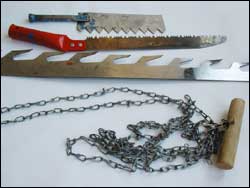
Many basic tools of snow sculpting such as saws, shovels, chopping knives, snow pushers, and even everyday kitchen knives are available at home. Ladders, ice drills and ice saws are also useful. There are also tools designed especially for snow and ice sculpting available in shops, and similar ones can also be made at home. Good tools make sculpting a fun, safe, and light activity. With this in mind it is worthwhile to spend some time on choosing and maintaining the tools. While sculpting it is important not to throw the tools on the ground, but to stick them standing up in snow. Tools made of iron must be dried after sculpting to prevent rusting. Shovels In snow sculpting both a pointed shovel and a light snow shovel are useful. The rough sculpting starts with a bigger shovel, but as the work progresses even a small garden shovel might come in handy. Saws Both regular saws and compass saws are useful in snow sculpting, while for a large work even an ice saw or electrical or chain saw might be needed. Special saws such as wire saws are suitable for carving out large masses of snow or creating curved shapes. Using soft new snow as plaster, smaller blocks of snow can be added on the sculpture to gain height. It is important to bear in mind, however, that one cubic meter of packed snow weighs 400 800 kg, so the blocks should be small enough for lifting. Filing ToolsRough and fine files are needed in bringing out the form and finishing the sculpture. An easy way to make a rough file is to put screws through a plywood board and to attach a handle on the other side. A finer file for finishing work is made by attaching a metal sheet punched with nails or a wire netting on a piece of wood.
|
|||||||||||||||
|
|
||||||||||||||
© Lapin yliopisto, Kemi-Tornion ammattikorkeakoulu, Rovaniemen ammattikorkeakoulu |
|